 Everyone is so busy now a days. If it’s not work, it’s everything else: family, home, and every single activity we can cramp into a 12 hour day – ok, a 14-hour day.
What don’t you have a 14-hour day? You are doing it wrong then.
So, when I have those days that I come home totally deflated because work has just kicked.my.butt all I want to do is eat a bowl of cereal and sit in a corner away from everyone to just get my center back.
Except that a bowl of cereal is not going to give me any energy to tackle the rest of the evening, so I usually turn to this salad. Mainly because I always have the ingredients that I need a hand and with the microwave being my best friend (sometimes) I can have this ready in less than 20 minutes tops.
Warm potato, tuna, olive oil and hard boil eggs. What else can comfort you like those ingredients? Nothing I tell you.
Ingredients
Serves 1 (double up if you need to feed more people)
2 hard boiled eggs
1 potato, the baking-type, such as russet
1 can tuna in oil
1/3 cup of olive oil or more
2 tablespoon of vinegar (1 for the salad and 1 for the eggs)
1 tablespoon of chopped herb of choice (Parley, Basil, oregano all work well) optional
Salt & cracked pepper to taste
If you don’t have hard boiled eggs lying around (like I do), then you have to make some. The sure way to do this is to take your eggs, cold from the refrigerator, and put them in a saucepan; covered with cold water, add a bit of salt (about ½ of teaspoon) which helps prevent cracking and will make the eggs easier to peel. Place the saucepan in a burner on high heat and bring the eggs to a rolling boil. As soon as the water start to boil, remove the pan from the heat, cover and let them sit for about 13 minutes. Why 13? I have no clue, but I been making enough eggs to know that for me that is the magic number. Sometimes it may need more (especially if you are making a bigger batch) and like everything in life, the shape of the pan, the size of the eggs, the amount of water, the type of stove, it can take a few more minutes. When you find the right time that works for you, stick with it. You can actually let them sit covered up to 20 minutes and they will not overcook.
Back to the eggs, once your time is up, strain out the water from the pan, and fill the pan with cold water, (you can do this over running water) until the eggs cool down a bit. Once cooled, store the eggs in a container in the refrigerator or in this case, peel them, chopped them up, sprinkle with a bit of salt and put them aside.
Now on to the potato or in my case micro'd potato.
You want to clean your potato before putting it in the microwave. Over water, rise and scrub off any dirt, dry it up and then taking a fork poke holes into the potato in a number of areas. A quick lesson here: The fork punctures will allow the potato to cook a little faster and keep it from exploding – which trust me is NO FUN.
Place the potato in the microwave and press the “Potato” setting, and forget about it. If your microwave does not have this setting, then cooking time may vary depending on the microwave and the size of the baked potato. The average time for a baked potato in the microwave will be about 8 minutes. If after 8 minutes you test it and it does not feel soft/tender to the touch, then cook it for another 2 minutes.
Once the potato has cooked it is a good idea to let it cool for about 1-2 minutes, then remove it from the microwave oven, cut in half and spoon out the center into a mixing bowl. Sprinkle with salt and the vinegar.
Add the chopped up boiled eggs.
 Open the can of tuna, and if there is a lot of oil, drain a bit off. Then pour over the potato/eggs in the bowl. Mix in the chopped herb of choice. With a spoon, gently fold all of the ingredients, Then I pour the olive oil, I usually eye ball it, you want the salad coated in olive oil (those potatoes will absorb a lot of oil) but not drowned in it. (I tend to like the taste of olive oil, so I usually do go heavy on the coating), toss a bit more, and serve at room temperature.
For me this is comfort food at its best.
Variation: If you want to go way out, I sometimes cut a tomato and throw that in as well. I did not have tomatoes this time, so I left them out. Boo!

 When you are a food snob like me, baby peas are called “Petit-pois” at my house. I really don’t have a answer as to the why. As far back as I remember that is what my mother called them and well that is how they stuck in my head. Even when I learned English, when I think of baby peas, I immediately translate them in my head to “Petit-Pois”.
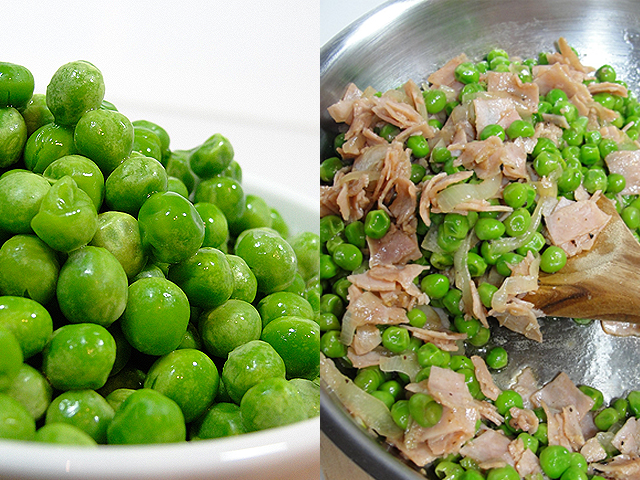 Now it’s the baby peas turn. In the pan they go, move them around, season with salt and crack pepper. If the pan seems a bit dry you can add the ¼ cup of water/stock (if needed). Cover, lower the heat to low and simmer for about 3-4 more minutes - I like my peas a bit “al dente” (not mushy) so after the time is up, I taste them, if peas are done, remove from heat and serve.

