
Italian Rustic Herb Bread

I’m a bread snob. Just like I’m picky about the type of chocolate I eat (the dark kind) I picky about the bread that I use to make my sandwiches.
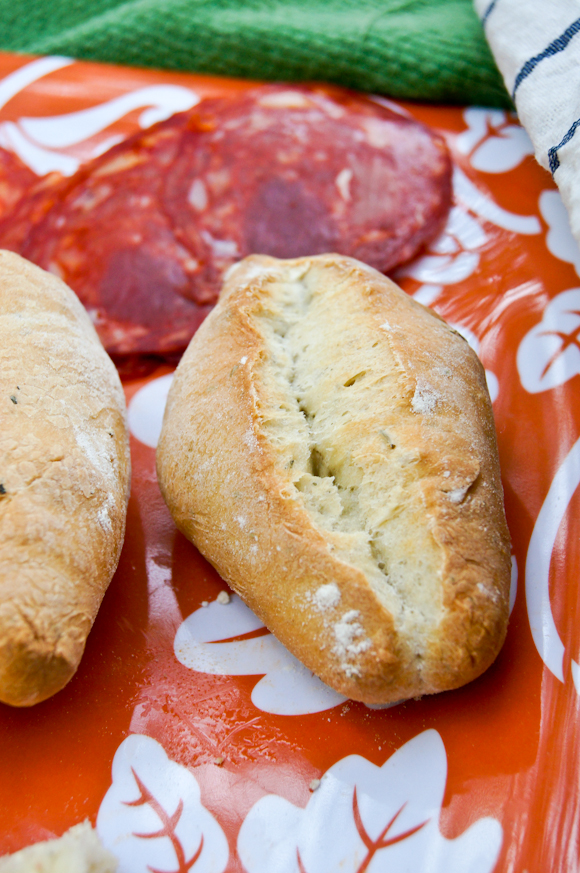
My preferences always turn to anything that has a crust that is darker brown and a creamy inside. If it’s right out of the oven, it’s a bite of heaven - especially, if it’s use to carry things like a good piece of cheese, salami or my all time weakness – Prosciutto.
Whoever eats prosciutto in soft sandwich bread should be shot in the spot. (I seen it and I have died a little too).
You may think I’m talking specifically about French bread. And while I adore French bread, this is not the only type of artisan bread that I love. Give me a good Ciabatta or a round crusty sourdough and I’m a happy camper.
So when I was planning our Christmas day meal and my mother offered to bring a selection of cure meats and cheeses to munch on while we waited for the Paella, I jumped at the chance to offer to make the bread for it.
Making some type of artisan bread has been in my kitchen bucket list for a while now, specifically French baguettes. While these are not the long, skinny recognizable baguettes, they are very similar in ingredients – which is just flour, water, salt and yeast and the added flavor of any choice of fresh herbs incorporate into the dough.
This is not a hard recipe to make, but prepare to be doing a lot of waiting around while the starter and then the dough rises.
I learned my lesson here, since I totally did not take this timeframe into account and before I knew it, we were munching on cheese and prosciutto with NO BREAD, since it was still doing it last rise. So, learn by my mistakes - give yourself plenty of time. The baking only takes 20 minutes and once the bread is done rising, then you can pop it in the oven to bake when ever you want.
The rewards is about 12 medium size loafs, freshly hot from the oven with a crunchy outside and the extra added rustic taste from the herbs.
ITALIAN RUSTIC HERB BREAD
Makes 12 rolls
POOLISH
- 1 cup unbleached all-purpose flour
- ½ cup tepid water
- ½ teaspoon active dry yeast
DOUGH
- 3 ½ cups unbleached all-purpose flour plus more for dusting
- ¾ cup plus 1 ½ tablespoon warm water
- 2 tablespoons extra-virgin olive oil
- 1 teaspoon fine sea salt
- 1 ¾ teaspoon finely chopped mixed herbs – (oregano, rosemary and thyme)
FOR POOLISH:
In a bowl, stir together flour, water and yeast. Let mixture stand at room temperature at least 10 hours or overnight.
For DOUGH:
Add flour, water, oil and salt to polish, mix together to form dough. Turn out dough onto a clean surface and knead until smooth and elastic, about 5 minutes (I choose to do this in my Kitchen Aid, with the dough hook)
Add the herbs and continue to knead for another 1 to 2 minutes to incorporate the herbs. Form the dough into a ball and then transfer to a large bowl. Cover bowl with a clean, damp dishtowel and let dough rise, in a draft-free place at warm room temperature, until double in bulk, about 1 hour. (I usually turn my oven broiler on low, to warm up the oven, then I turn it off and put the dough to rise in the oven – nice and warm and draft-free!).
Spread a clean, dry dishtowel on work surface. Dust the work surface and dishtowel with flour. Divide dough into 12 equal pieces; roll each piece into a ball. Cover balls with a clean damp dishtowel and let it rest for 10 minutes. On work surface, stretch one ball into a 2x8 inch rectangle. With short side of rectangle facing you, fold bottom edge to center, then fold top edge to center. Press firmly with fingertips to seal seams, then fold in half, folding bottom edge over top. Pinch together all seams, then gently roll dough to create a 5-inch long loaf.
With the edge of your hand, firmly press center of loaf to create a deep indentation. Transfer loaf to prepare dishtowel. Repeat with remaining dough. Sprinkle flour over indentation, then cover loaves with a second clean, dry dishtowel. Let rise, in a draft-free place at warm room temperature, 25 minutes.
Heat oven to 450 F with rack in middle. Line two baking sheets with parchment paper. Arrange loaves on baking sheets. One batch at a time, bake rolls until deep golden, about 20 minutes. Let rolls cool on a wire rack at least 10 minutes before serving. (we could not wait and had them at the 5 minutes mark).
If you would like more tips and tricks, head over to The Fresh Loaf. A great site for Amateur bakers, they have this great Lesson – Ten Tips for Better French Bread, which can be applied to this recipe as well – if you want to be a little more daring than I was. I for one, plan baking my next batch using a baking stone (tip #2) and a little steam (tip #1) in the oven, as well as using the Autolyse method (tip #8).
Yes, I’m hooked now, say a little prayer to our hips.