Arepas Dulces: Sweet Venezuelan filled corn cakes
 These little round disks are a staple food in my country. Growing up in Venezuela these were eaten for breakfast, as a side to any dish even as a midnight snack after a night out of heavy dancing.
In Venezuela you have small local “areperas”, which only served this corn cake with tons of choices for filling: ham, cheese, eggs, shredded beef and many, many more choices. We also have tons of nicknames for the way they may be served. A “Reina Pepiada,” (shredded chicken, mayonnaise and peas with slices of soft avocado.) named after Venezuela’s first international beauty queen Susana Dujim. A plain arepa is called a viuda or “widow,” because it’s all alone. A chicken and cheese arepa is called catiraor “blondie,” for its yellow color. Arepa “Perico” is made with a scrambled eggs and you also have Arepa “Rumbera” (Party) which is made with Pork meat. You can grill, fry or bake them. In Venezuela they are usually made on top of a “budare”, which is a large skillet, that is heated until very hot and the arepas are then grilled.
For me I love them any way, but this past weekend I had a huge craving for them, but I wanted them sweet. And this recipe is from my nanny (yes, I had one of those growing up – don’t you judge me, that’s another staple in my country, everyone had a maid living in their house). My nanny, Maria, made them just like the “regular” savory arepa, but she did put a bit of sugar on them and instead of forming them into a thick disk, she made them a bit thinner. This created a reaction when they got placed in hot oil to fry them and before you very eyes, the top of the arepa will bubble up and create a crispy dome.
The hint of sweet with the savory filling is such a blissful combination. They are not very difficult to make and in less than 20 minutes you can have a batch ready.
There is a great debate that the only way to make them is by using pre-cooked corn meal flour called “Harina P.A.N” which is actually imported from Venezuela and found in most supermarkets in the Latin food aisle. If you cannot find this, you can also use Masarepa, but be warned they are not going to come out as authentic.
To make about 4-5 Arepas you will need:
1 cup of Harina P.A.N (pre-cook corn meal flour)
1 ¼ cup of warm water (or a bit more)
¼ teaspoon of salt
1 tablespoon of sugar
1 ½ cup of oil for frying
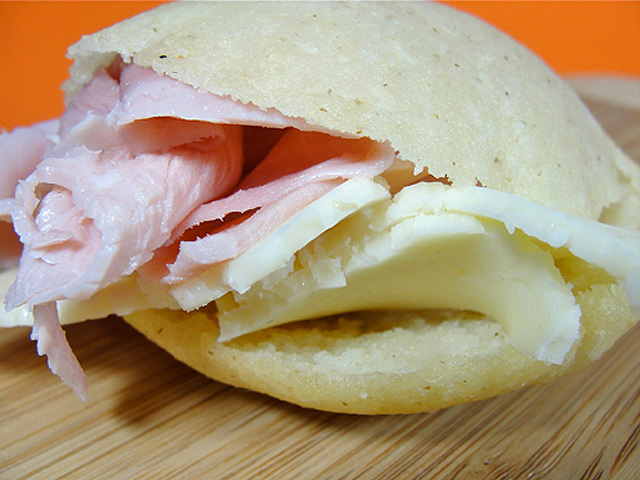
Filling: Anything you want, in this recipe I filled my up with cheese and ham.
Warm up the water, and then mix in the sugar and salt – taste, the water it should be a bit sweet with a hit of salt. You can add more sugar or salt at this point too.
In a mixing bowl, pour the cup of Harina PAN, then with your hands slowly mix while pouring about ½ of the water mixture. With your hands continue mixing, if dry, pour more water, while kneading, about 5 minutes or so. The dough should end up smooth and not crack around the edges, moist but not sticky.
To form them, put some dough between both palms, slowly start rolling the dough and form a ball, then still rolling between both palms, slowly flatten the ‘dough’ to the thickness you want, in this case about 1/4” or so. Make sure the edges (and the tops) are round with no cracks! If you have any cracks, they will not bubble up when you immersed them in the oil. When you are flattening them you see some cracks forming, dab your finger in water and try to ‘erase’ the crack.
As you form them put them aside and cover them with a damp towel or paper towel, so they don’t dry up.
Place the oil in a deep saucepan in medium high heat, the oil needs to be very hot, but not smoky or when you put the first arepa it will burn - not good. To test it, take a bit of the dough, roll into a small ball and dip in the oil, if the ball start to fry fast (bubbles all over it) and raises to the top, then the oil is ready.
 Slowly, take the prepare arepa disk and place in a metal slotted spoon and slowly dip in the oil. It will start to bubble up fast and then within a minute or so (sometimes a bit more), the top should start to inflate up … fry for about 2 more minutes until the top is nice and golden color. Take out and place in a dish covered with paper towel so it will absorb the oil. Note: If they don’t inflate, don’t worry, continue to cook and remove once they are golden color - they are just as good.
 Continue doing this until all of your prepared dough disks are cooked.
When ready to stuff them with your favorite filling, open a slit in 1 side of the arepa to make a pocket (or slice in half) and filled them with your favorite filling.
You can also do the same steps, to create one without the sugar. Just obmit, and instead of flatted them, make the a bit thicker about 3/4-inch. You can also fry them, or simply bake them in the oven at 350 for about 15 minutes or so, until they sound a bit hallow when you tap them, or grill them in a hot grill. There is a good video in how to make them here.