Rajas con Queso


I originally saw this in Food Network show that has since been cancelled and thru the years have modified it.

This is an easy recipe and a life saver, because if you have all the ingredients and you organized yourself a day or two before cooking, it should take you no more than 10 minutes to have it on the table for anyone to gobble it up. .

The other plus about it? It’s a proven crowd pleaser as party food.

I mean tortilla and melted cheese, can’t be beat people. Trust me.

Ingredients
5 or 6 fresh Poblano chilies
3 tablespoons corn oil
2 large onions, halved and sliced about 1/4-inch thick
1 (16-ounce) container sour cream
1 Chicken bouillon granules
1 1/2 cups Oaxaca or Mexican cheeses (those shredded cheese packages are perfect for this)
In order to save on prep time, I usually roast the Poblano a day or two before I put this together, since it keeps well in the refrigerator for up to 2 weeks. Then when I make this, all I have to do cut the onions and whip it up in less than 5 minutes.

If you have a gas stove, you can roast the Poblano chilies over an open flame until blackened, but not charred. If you don’t have a gas stove, then turn your oven to broil, on high and place the Poblano chilies in a baking tray, lined with aluminum foil. Coat each of the chilies with a bit of oil and sprinkle with salt. Cook until you get the same results as noted before. If you do use the oven, remember to check then every 2-3 minutes and given then a turn so they roast evenly all around.

Once they are cooked to the right color. Wrap the chilies in a towel and place them in a plastic bag for about 10 minutes. Remove the chilies and with the help of a kitchen towel rub the skins off. The chilies should be firm. Do not rinse them, since it will take away the roast flavor. Cut them in 1/2-inch strips discarding all the seeds and the ribs. At this point you can store them and use them up later.

Heat the oil in a large pan over medium heat. Add the chilies and the onions at the same time. Stir often. When everything is soft add the chicken bouillon granules to taste and stir, once is incorporated, add the sour cream and stir some more.

At this point turn off the burner and add the cheese. Cover immediately.

At my house we have this with warm tortillas, but you can also serve it with white rice.

Tip 1: If you choose to dish up at a party, I have found that if you use a small crock pot, to keep it warm and provide with warm tortillas your guest can make their own.

Tip 2: Other variations that I have tried are instead of Poblano chilies I have sautéed some mushrooms until tender and then add the onions and follow the rest of the recipe as noted above.

Frescolita Ice Cream (Cola-Ice Cream)

We are going down memory lane today. You have been warned.
I was born and spend my early years growing up in Venezuela. And like most people those food that you eat in your childhood just stay there, in your soul.  Just the smell of them brings me down memory lane.

I lived in a small town (back then) in the most southern part of the country.  We were knows as the last stop before going to the Amazon jungle and experiencing the Salto Angel. In Venezuela (and like most latin countries), neighborhoods have a sense of community. Most people live in a house for years and years, so everyone knows everyone’s business; kids grow up together and play together.  My fondest childhood memory was that of playing outside our house on the street with other kids around the neighborhood. It was as tacky as any movie, where kids were left to run a bit free and pretty much do whatever we could do before being called back into the house by our parents.
Most of the “barrio” (Neighborhoods) have families that sell something to make a bit of extra cash on the side. I remember in my barrio we would have the house that would sell homemade cakes, another one that would have “Pastelitos” and “Empanadas” (pastry filled with all types of filling). And the tequeños (which trust me I will be making some and posting it here) Some when as far as having a “Bodegita” and part of a small business - think of it as a raw version of a “Farm Store”

Many of times I was given money and told to go to the bodega to get something my grandmother needed or forgot to get at the big supermarket. It love doing that because then, I could sneak a “real” (the equivalent of 25 cents) from the change to buy a Toronto, or a Cocosete.

And sometimes I would collect my “reales” and have enough (1 Bolivar = 1 dollar) to go to the green house down the corner and buy a “Helando de Frescolita” (Soda Pop ice cream). They were delicious, and creamy, sweet and ice-cold, a great treat for the hot days.

When I left Venezuela and came to the states, those were the treat that I would miss, those homemade cakes and ice creams, made by the women in the “Barrio”. As I got older and traveled back for vacation, I finally go the guts to ask how to make them and was surprise that all you needed was 2 ingredients.

Frescolita and sweeten condense milk.

Oh yeah, see where this is going?

To deliciousville on the fast train! (because anything with sweeten condense milk is ok with me)
Frescolita is a Venezuelan cola. It is very similar to cream sodas found here in the United States, with a taste similar to bubble gum. It’s yummy and one of my favorite soda drinks.

Most Latin markets sell them, or in some cases a version of the same thing, so it should not be hard to find, you can also buy it here

So let’s get cracking… you will need:


Ingredients 
1 can of Frescolita (or similar cream soda)
1 can of sweeten condense milk (we will use about ½ of the can more or less and some more to coat the inside of our cups)

Equipment:
A blender, some small plastic cups, a container to hold them in the freezer (Tray, cake pan, etc).


We start off by pouring the can of frescolita into the blender, then take the sweeten condense milk and pour some of that yummy liquid into the individual cups, coating the bottom. It should be about 1 tablespoon per cup (you can put more or less, depending on how much you like sweeten condensed milk). then pour about 1/2 of the can of condensed milk into the blender. Hit mix and swirled it up until well mixed, about 2 minutes or so. 

Taste it and if is not sweet enough, pour some more condensed milk and mix again. I personally don't like it too sweet, plus keep in mind that when freezing it, the flavors will intensify.

Pour the mixture into the coated cups about 1/2 way full, place into a tray or pan, cover wtih aluminum foild and into the freezer they go. Freezer for about 24 hours.


When ready, to eat just take out of freezer and spoon it up!

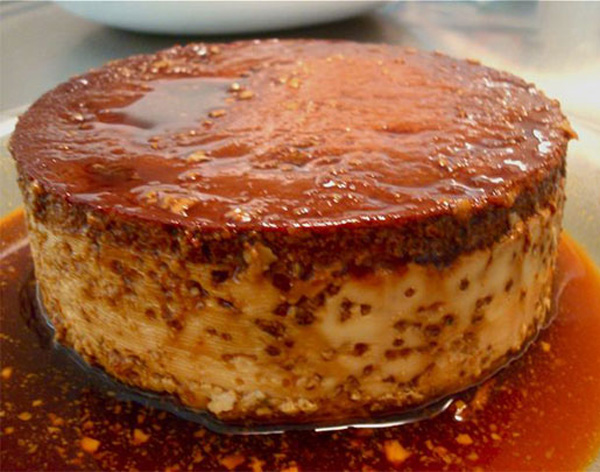
Quesillo

Ok folks this is so easy, there is no excuse to make one every weekend. It's rich, it’s creamy and oh, so good.

In Venezuela, as well as most of Latin America, everyone makes Flan and most of you probably have tasted some type of version of this creamy custard dessert. In Venezuela we make our version of Flan and call it: "Quesillo". The ingredients are your basic eggs, milk, vanilla, caramel and sweeten condense milk and a dash of run. It is bake either in a pressure cooker, or in the oven using the bain-marie (also known as a water bath) technique. Or the most original way will be in a cracker/cookie can, which I will talk about later.

The desert gets its name because, "Queso" mean "cheese" in Spanish and when its bake right and un-molded, it comes out looking like a "cheese". And while it’s super simple to make, oddly enough, most of the Venezuelan makes it only during a special celebration. Every birthday party has a cake and a Quesillo.

The cast of ingredients is composed of eggs, sweeten condense milk, whole milk, vanilla, lime peel and rum. But first we need to make the yummy caramel sauce - all it takes is sugar and a bit of water.

In a heavy sauce pan and mix the sugar and water, over high heat. The sugar will start to boil and then will start to slowly turn colors on you, first into a pale amber, and escalating into a medium, dark color; NOTE: Once you hit the pale stage DON'T WALK AWAY FROM IT, because it will jump into the medium and then dark very, very fast and if there is nothing more horrible, is BURNED sugar!
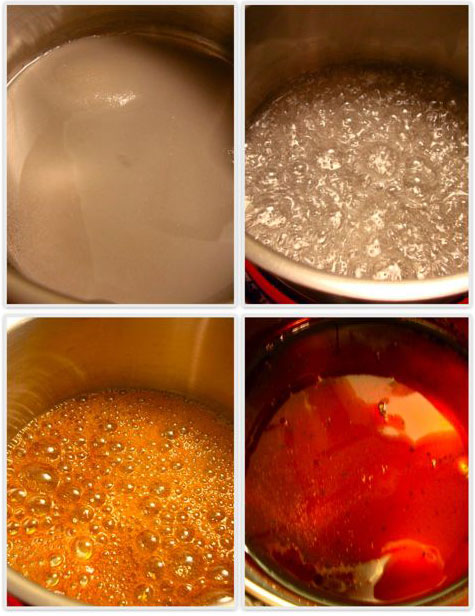
So, make sure you are on top of it at all times. When you see it turn into a dark rich color, remove from heat and pour into the baking dish. Tilt back and forth to cover the bottom and sides of dish, getting it nice and evenly coated. Again, be careful, the caramel at this stage is very hot and may burn you (Badly!). I usually cover my baking dish with a towel while I'm coating it.  Let the caramel in the pot cool, so put it aside.

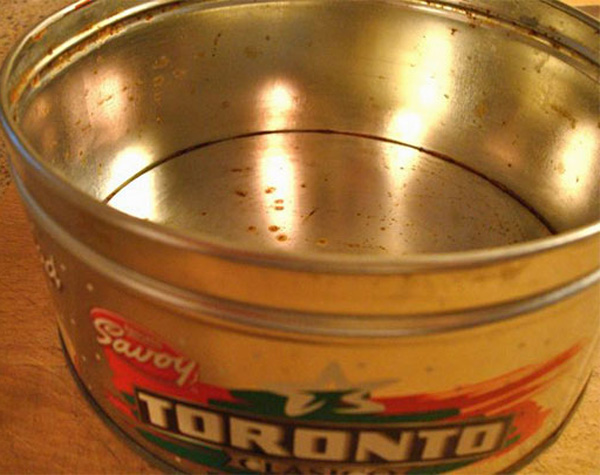
Side note: Let’s talk about the baking dish for a bit. You can use any you like. But, my grandmother taught me to use a cracker or cookie can as seen below. Don't let the look fool you, this is the best thing to make the Quesillo in.

Yep, you read it right, a can! Which it’s the perfect baking vessel, it has a lid, which fits nice and tight and its the right height and it may sound totally off the wall, but the can gets cured with past baking and the caramel and custard just taste better. But, you can use anything you like if you can not find, or feel comfortable using a can.
Back to making the actual custard.

Turn your oven to 400 Degrees.

The next step are simple enough, in a blender, pour the can of condensed milk - YUM! (lick those finger - go ahead you are allowed, I can wait) Then take the empty can and measure the whole milk and pour into a separate glass container (I use a measuring cup) with the strip of lemon peel and put in the microwave for about 2 minutes to warm up. Back to the blender I go and pour the warm milk, then the vanilla and run (if you are using, which I highly recommend you do) the blender at medium speed for about 1-2 minutes, while you are running the blender, you start adding the eggs one by one until fully incorporated.

Pour the custard mixture into the baking dish that you coated with caramel and place inside a larger pot. I usually like the specs of the lime peel, but if you don't you can strain the custard before it goes into the coated caramel baking dish.

You are ready to bake it! Take your baking dish and cover the top with aluminum foil, nice and tight. Then place into a bigger heavy dish/pan. You are ready for the water bath - Pour in enough hot water into larger pot to reach halfway up the sides of the baking dish. TIP: if you squeeze the previous peeled lime into the water, the pot you are using will not turn black during the baking process.
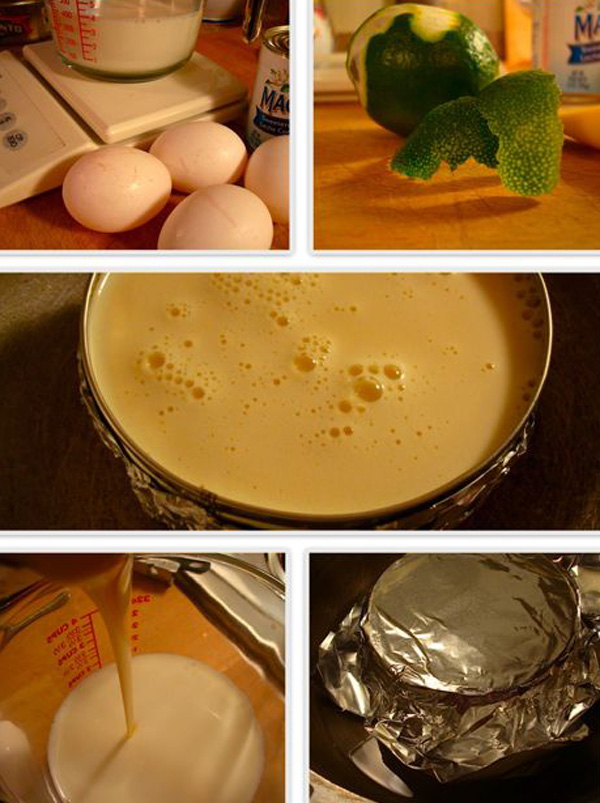
Slowly place into the middle rack of your hot oven and bake about 55 minutes, covered. Then uncovered and bake another 20 minutes. The custard is ready when you touch it and it feels firm but a bit wiggling in the middle. Take out of the oven - again, be very careful, since the water inside the large pot it's very hot! Set aside to cool off, about 30 minutes or so. Once is cooled, place in the fridge for at least 3-4 hours before serving. I recommend you leave it overnight.

When ready to serve and un-mold, dip the flan in a saucepan of hot water, or in the sink full of hot water from the tap for a few seconds. It should lose up, but sometimes, you need to run a knife around the edge to help it a bit. Invert the Quesillo onto a plate with lip in order to save all that yummy caramel!

Served and enjoy the praises

Ingredient

(Makes a medium size Quesillo) if you need to make a bigger one, double the ingredient

Caramel Sauce:

6 tablespoons of sugar

2 tablespoons of water


Custard

1 (14-ounce) can of Condensed Milk

1 (14-ounce) can of whole milk (use empty condensed milk can for measure)

1/2 teaspoon of vanilla extract

1 lime peel or 1/4 teaspoon of grated

1 tablespoons of dark rum (could omit if desired, but I highly recommend not do so)

6 eggs (4 whole eggs, 2 yolks)

Instructions:

See above