
HCB: Apple Upside-Down Cake

And I’m back baking from Rose’s Heavenly Cakes. We are in the last stretch, and the last couple of weeks nothing in the line up has made me run to the kitchen to bake, making my HBC participation the last thing on my to do list the last couple of months.
I blame it on the fact that everyone is feeling the inferno that the weather god is sending our way this summer with those 100+ temperatures. Who in their right mind want’s to turn the oven on when it’s like a gazillion degrees outside?
But, this week was free choice and I wanted to bake – because well, I’m crazy! I have a love-hate relationship with the “free choice” options. In one end, I love it because I get to choose what I’m going to bake, in the other; I hate it because I get to choose what I’m going to bake. I dislike having so many choices – give me 3 and I can make a decision, give me over 3 and I become this indecisive puddle of doubt. I ended up having to call Tom and ask him to narrow it down.
It was a no-brainer that he went for the one cake that had fruit on it.
After I made him promise that he will be totally responsible for eating the whole thing, I headed to the supermarket to buy apples and set to work.
This cake is the first cake you will encounter when you open the book to the first chapter of butter and oil cakes. It’s also the cake that has, in my opinion, the ugliest picture (sorry Rose publisher!) in the whole book – in order words, it had nothing going for it to inspired my baking juices.
But, my boyfriend wanted apple cake and he was going to get apple cake.
The cake is not very hard…the star here are the apples which are left raw, but then soaked in brown sugar and lemon juice, then the juices are turned into caramel by adding more brown sugar, butter and cooking it down into a deep, rich sauce, I added a splash of rum to it, to give a twist. The recipe does call for bourbon but on the whipped cream to serve with the baked cake. Since I had decided not to served it with the cream, I told myself that adding liquor a this point was a totally justifiable move.
I doubt anyone will disagree with my thinking – there is not enough boozy cakes out there if you ask me.
So, back to the cake. The caramel gets poured on the baking pan, and then topped with the apples, making a pretty overlapping pattern. I realized at this point that I had not sliced my apples to the right ¼” thickness. Some of my apples were to thick to make a pretty arrangement.
I decided to let it go and did the best I could.
The batter was up next and came together quite fast. Rose mentions that if you have a baking stone to use it, this will keep the bottom of your baking pan quite hot, making sure that your caramel never hardens. I actually going to use this tip moving forward with anything that has caramel on the bottom of it – one word – BRILLIANT.
The cake was done at the 35-minute mark. The best part of this cake is that there is no cooking down period. You take it out of the oven, you loosen up your side of the cake with a knife and then you flip it over and let it sit for a bit.
Then you pray - very hard - that nothing sticks to the pan.
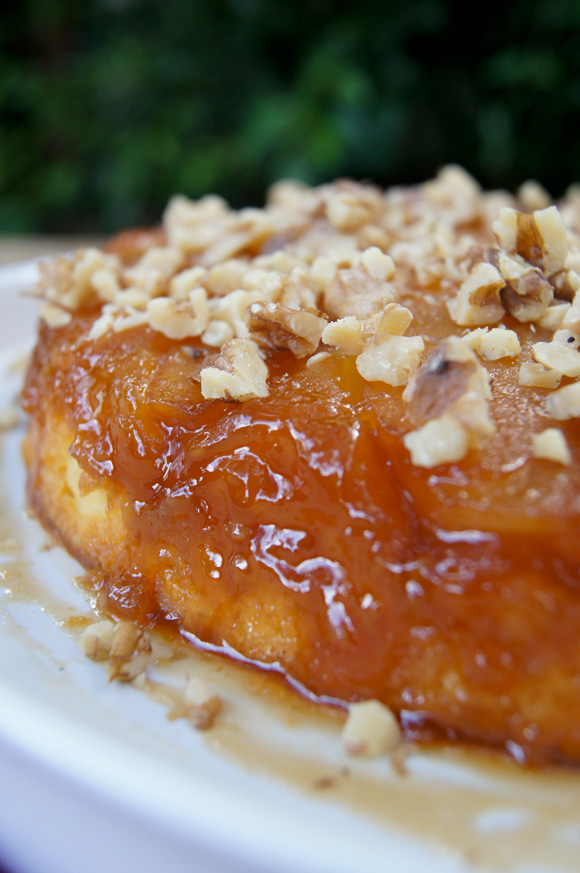
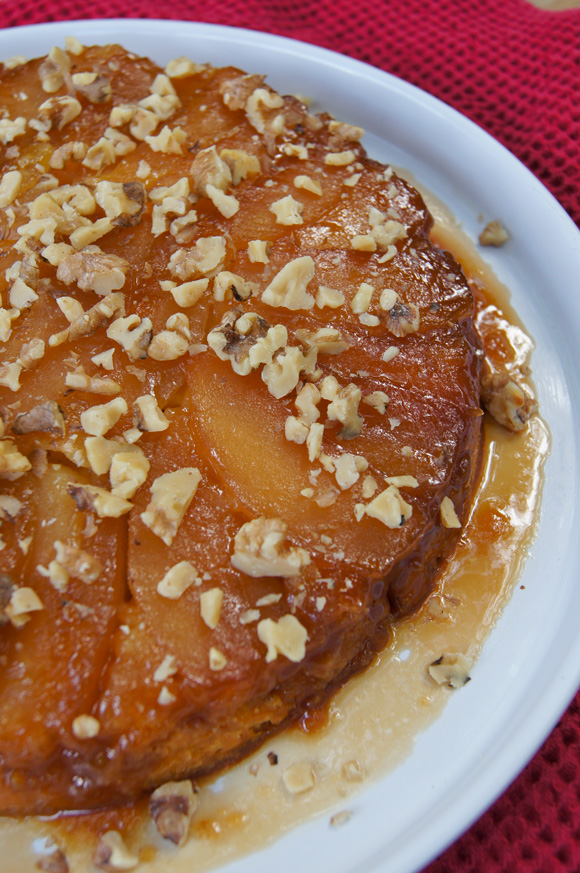
The cake fell of the baking pan beautifully. I did not loose one single apple. I made sure to remove the parchment paper right away and then covered the whole thing with the chopped walnuts.
Then I gave it to Tom to critique.
Verdicts:
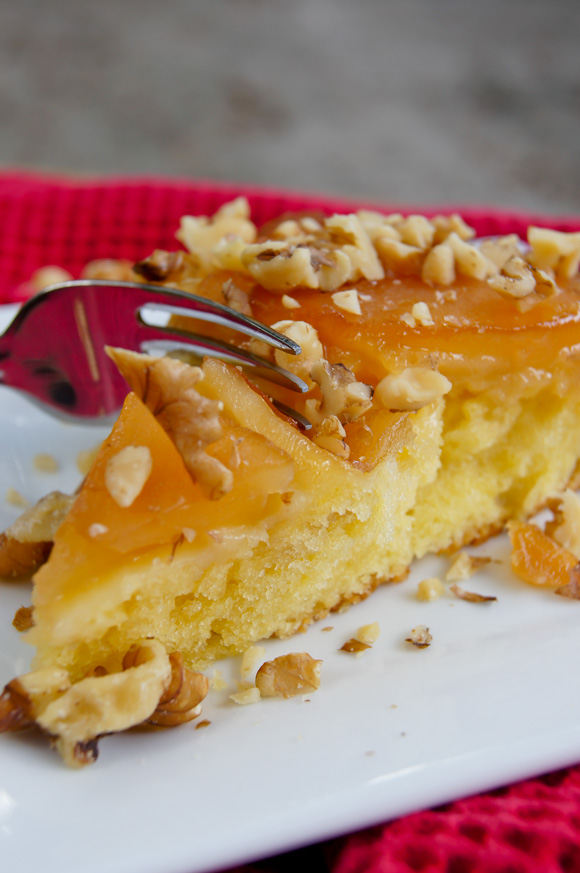
Tom: “It’s very good, the walnuts gave the cake a grainy texture - almost like corn bread, but it’s delicious, thanks for doing my choice. Don’t worry there are not going to be leftover”.
As for me, I tasted the cake part and its very good, perfect combination with the sweet topping of apples and caramel. Not to sweet and you can taste the tart undertone of the sour cream.
And since the recipe is posted in Rose’s Amazon page, I get to share it with you. I have not included the full volume measurements, you can get those if you click above on the Fall into Cooking Amazon page.
APPLE UPSIDE-DOWN CAKE
Apple and Walnut Topping
- 1 ¼ pounds of apples (about 2 large), peeled, cored, and sliced 1/4-inch thick
- 1 teaspoon, lemon juice, freshly squeezed
- 1/3 cup, firmly packed, divided light brown sugar, preferably Muscovado
- 4 tablespoons (1/2 stick), divided unsalted butter
- 2/3 cup walnut halves
Special Equipment: One 9 by 2-inch round cake pan, encircled with a cake strip, bottom coated with shortening, topped with a parchment round | Baking stone (optional)
Preheat the Oven: Twenty minutes or more before baking, set an oven rack in the lower third of the oven, set a baking stone, if using, on the rack and preheat the oven to 350°F/175°C.
Make the Apple Topping: In a medium bowl, toss together the apples, lemon juice, and 2 tablespoons of the brown sugar. Allow the mixture to sit for at least 30 minutes or up to 1-1/2 hours. Drain the apples, reserving their liquid.
In a small heavy saucepan, preferably nonstick, melt the butter. Use about 1 tablespoon to coat the parchment-lined bottom and the sides of the cake pan. Add the remaining brown sugar and the reserved liquid that has drained from the apples to the butter remaining in the saucepan. Bring to a boil, stirring constantly with a light-colored silicone spatula, then stop stirring, but leave the spatula in place to judge the color, and simmer for about 3 minutes, until bubbling thickly and deep amber in color.
Pour this mixture (do not scrape) into the prepared cake pan, tilting to coat the entire bottom. Don’t worry if the mixture hardens; it will melt during baking. Place the apple slices, overlapping slightly, on the bottom and around the sides of the pan. Set aside.
Toast the Walnuts: Spread the walnuts evenly on a baking sheet and bake for about 7 minutes to enhance their flavor. Stir once or twice to ensure even toasting and avoid overbrowning. Cool completely. Chop coarsely and set aside.
Highlights for Success: To core apples, cut them in half and use a melon baller to scoop out the core. Slice each half in half and then each piece into three pieces. The baking stone helps to darken the caramel on the apples.
CAKE BATTER
- 3 large egg yolks, at room temperature
- ½ cup sour cream
- 1 ¼ teaspoon pure vanilla extract
- 1 ½ cups sifted into the cup and leveled off, (150 gr) flour (or bleached all-purpose flour)
- 3/4 cup, (150 gr) superfine sugar
- ¾ teaspoon baking powder
- ¼ teaspoon baking soda
- ¼ teaspoon salt
- 9 tablespoons (1 stick plus 1 tablespoon), unsalted butter (65° to 75°F/19° to 23°C)
Mix the Liquid Ingredients: In a medium bowl, whisk the yolks, 2 tablespoons of the sour cream, and the vanilla just until combined.
Make the Batter: In the bowl of a stand mixer fitted with the flat beater, mix the flour, sugar, baking powder, baking soda, and salt on low speed for 30 seconds. Add the butter and the remaining sour cream. Mix on low speed until the dry ingredients are moistened. Raise the speed to medium and beat for 1-1/2 minutes. Scrape down the sides of the bowl. Starting on medium-low speed, gradually add the egg mixture to the batter in two parts, beating on medium speed for 30 seconds after each addition to incorporate the ingredients and strengthen the structure. Scrape down the sides of the bowl. Using a silicone spatula, drop the batter in big blobs on top of the apples. Then smooth the surface evenly with a small offset spatula while keeping the apples in an attractive pattern. Bake the Cake Place the pan in the oven on the stone, if using it. Bake for 35 to 45 minutes, or until golden brown, a wire cake tester inserted in the center comes out clean, and the cake springs back when pressed lightly in the center.
Unmold and Cool the Cake: Run a small metal spatula between the sides of the pan and the cake, pressing firmly against the pan, and invert the cake at once onto a serving plate. Leave the pan in place for 1 to 2 minutes before lifting it off. If any apple slices have stuck to the pan, use a small metal spatula to place them back on the cake. Scatter the toasted walnuts on top. Serve warm or room temperature. If warm, serve the bourbon whipped cream, if using, on the side instead of on top of the apples.
BOURBON WHIPPED CREAM
- ½ cup heavy cream, cold
- 1 tablespoon bourbon, such as Maker’s Mark
Make the Bourbon Whipped Cream: In a mixing bowl, combine the cream and bourbon and refrigerate for at least 15 minutes. (Chill the mixer’s beaters alongside the bowl.) Whip the mixture, starting on low speed, gradually raising the speed to medium-high as it thickens, until the cream mounds softly when dropped from a spoon. If not serving it at once, cover and refrigerate for up to 6 hours.